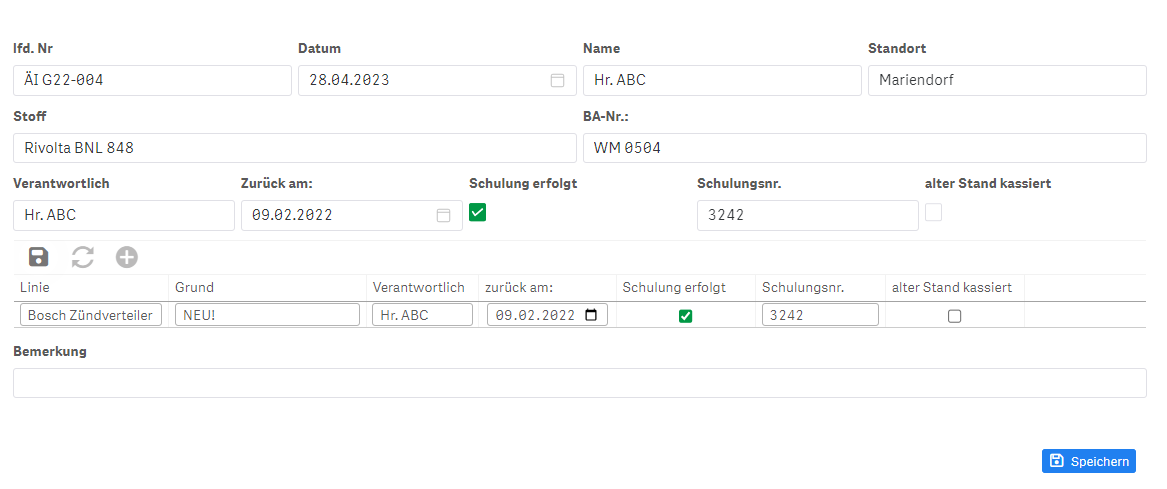
Form Elements

The heart of the form are the different form elements. They can be configured in the properties panel for each page. The form elements by default split a line into blocks of the same width.

The form elements can have the following properties:

  • A Name - only used for the display inside the properties panel array.
  • A Label - the text displayed above or next to the form element.
  • Hidden - remove the form element from the form if the qlik expression evaluates to true or -1
  • Disabled - disable but show the form element if the qlik expression evaluates to true or -1
  • Save if hidden - if the value of the form element will be saved even if the form element is hidden
  • Data options
  • Validation options

And can be styled:

  • Margin Bottom - the margin below the form element.
  • Placeholder - the placeholder text displayed in the form element.
  • Horizontal Order - The label and form element are placed next to each other in one line.
  • Alignment - align the form element label to the left, right or center.
  • Required Star - display a red required star next to the Label.
  • Border Color - change the border color of this form element.

Design Tip

Most of the labels/text options support HTML. This allows for images and other styling options.

The following FormElements are available:

NewLine

Start a new line for the next Form Element.

TextInput

Input a text into an Input or TextArea.

NumberInput

Input a number into an Input. Shows also buttons to increase or decrease the number (only outside of the Edit Mode). The option Default Value Remove Zero Values can be used to configure the behaviour if an emtpy values is evaluated. Either it is converted to 0 or the input is cleared.

Divider

A Line dividing the form into sections.

Paragraph

A paragraph of text.

A paragraph of text that is displayed as a header.

Radio

Choose between a list of options. The Options are supplied by a Qlik expression splitted by |;|.

ButtonGroup

Choose between a list of options. The Options are supplied by a Qlik expression splitted by |;|.

Switch

Input a boolean value via a Switch. The Form of the Switch can be set to be Squared

DatePicker

Input a Date. The format can be chosen from predefined formats or a custom formatopen in new window.

TimePicker

Input a Time. The format can be chosen from predefined formats or a custom formatopen in new window.

Checkbox

Input a boolean value via a Checkbox.

Checkbox Group

Select multiple options from a list of options. The Options are supplied by a Qlik expression splitted by |;|. The values are saved as an array and for saving may need to be joined via formatting.

Choose from a list of options. The Options are supplied as Labels and Values either by a Qlik expression splitted by |;| or a Expression evaluated to a list object. Multiple Selections allows to select multiple options and save them as an array. Most of the time you will join the array via formatting to save the field in the db.

Selection independence & dependent selections (object)

The values are dependent on the selections made in contrast to the dropdown label expression which are selection independent. To avoid - symbols after selecting a value (and errors while selecting) in the dropdown you can use Set Expressions.

Simple:

Value:
Only({1}Num)

Label: 
Num

With filter:

Value:
=only({<job_id={'$(=GetFieldSelections(job_id))'},article_id>}article_desc)

Label:
=aggr(only({<job_id={'$(=GetFieldSelections(job_id))'},article_id>}article_id),article_id)

TIP

All occurences of fieldnames are replaced by their corresponding value if written like this:

$f(fieldName)

Cascade Dropdown

Functions like a dropdown but a formula for a category name can be entered to create a nested dropdown menu.

Rate

A Rate element allows you to rate with a count of stars.

Slider

A Slider allowing to input a number betweeen Min and Max in Step steps.

ColorPicker

The color picker can be configured for a certain format (hex, rgb, hsl, hsv) and if alpha values are allowed. Additionally a palette of colors to show can be configured.

File Upload

Upload Files! These can be uploaded via an Action. You can choose between a button and a drop zone.

Button

Run an action on button click. The action can be chosen from the End Actions or the Next Page/Save. The next option provides a possiblity to customize the position of the save button.

Empty

This is an empty block. This can be useful for advanced layouts.

Master Object

Include any Master object into the form. The height of the MAster object can be configured using the height property.

Data+Table

A Master Object can be used to display a Data+Table. This allows editing in a table form and also array input if used with the Create Entry functionality.